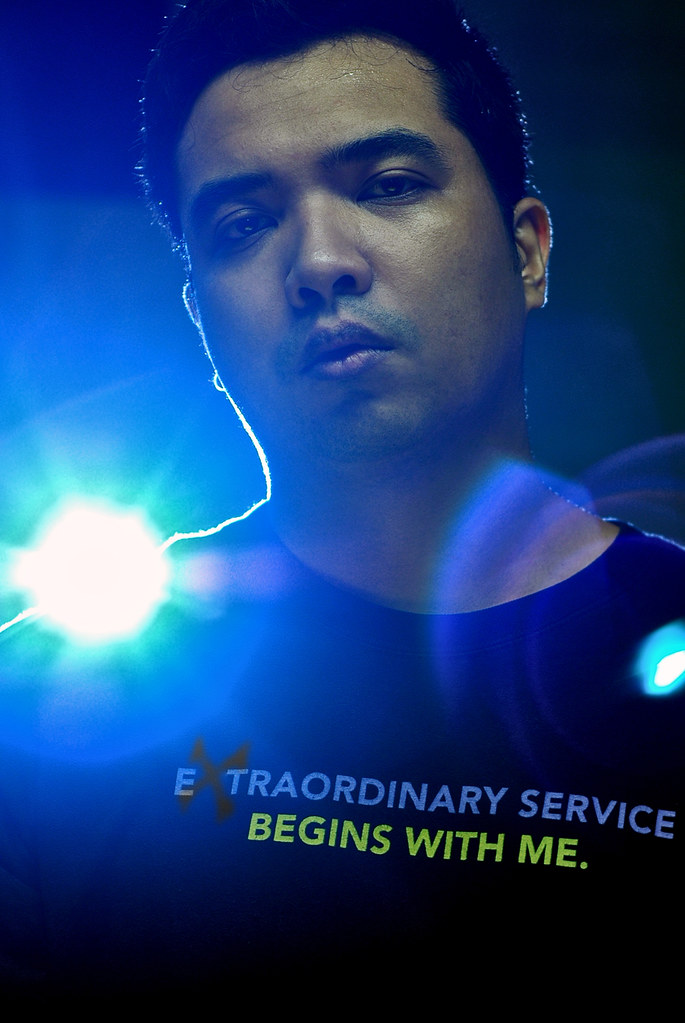
Strobist: Flash from behind subject with blue gel at 1/4 power; Reflector from the waist level reflecting fluorescent bulb from above
This was our motto when I was back in customer service eons ago. I guess I liked it, and it shows that I still kept the free shirt. Anyways, this week has been nothing more than extraordinary. It has been really fun doing this each day. I still can't get over the look people give when they see me shooting myself in weird places.
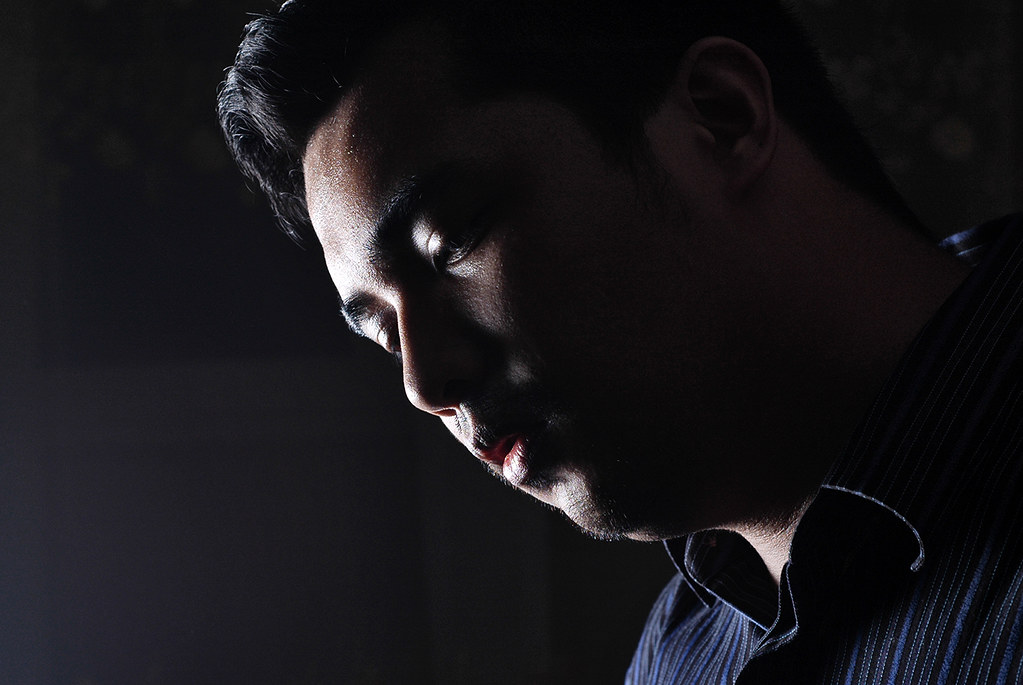
The lighting technique for today is the total opposite of day four. Day four was Flash as my main light with the sun (available light) as my kicker. Today, I used the flash as my kicker and available light (fluorescent bulb reflected to a gold round reflector) as my main light. I haven't done this kind of technique before and it was nice trying it out. Hope you like it.
At the end of this 7 day project I'll be posting some observations and the things I learned. I can say that right now, my confidence is growing, and I can feel like I can shoot total strangers without any problem.
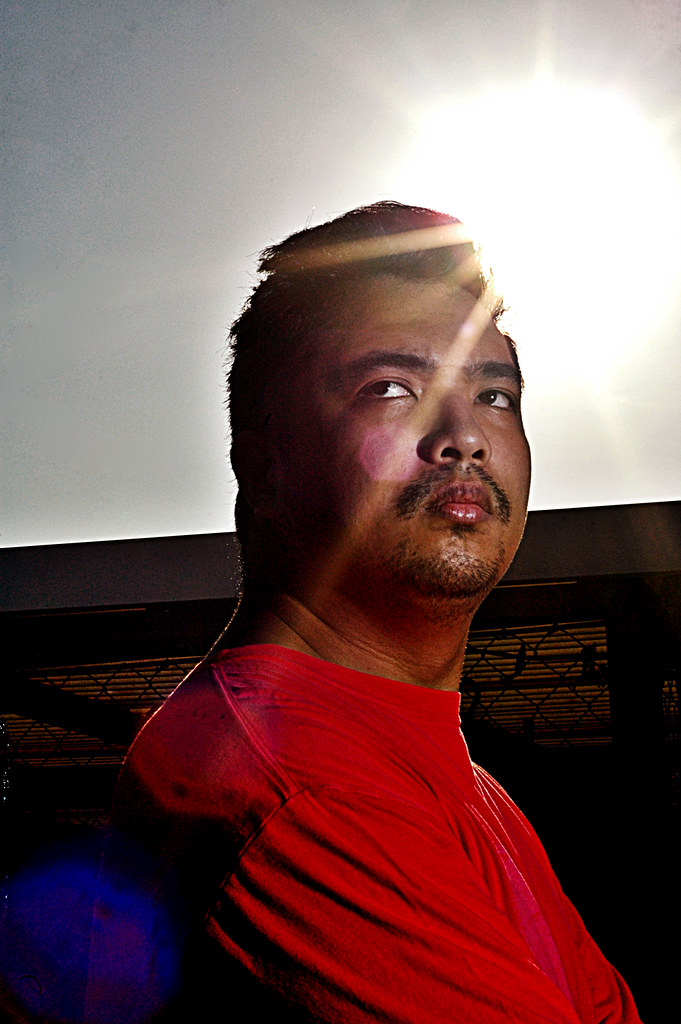
Flash from camera right in front of subject @1/2 power
Day four comes to you 8 hours after the last one, only because I might be coming home really late tonight and I might miss today's image. This one was from our rooftop. I have been looking to shoot there in the morning, as our side of our "mini village" gets the beautiful daily sunrise.
So far the project hasn't been really hard, as I keep on getting crazy ideas for each day. I may not make them all in this project, but I'll surely have them for the next project.
I kinda cheated on this one as I used "two" light sources, flash in front, sun from the back. Hope you like it.
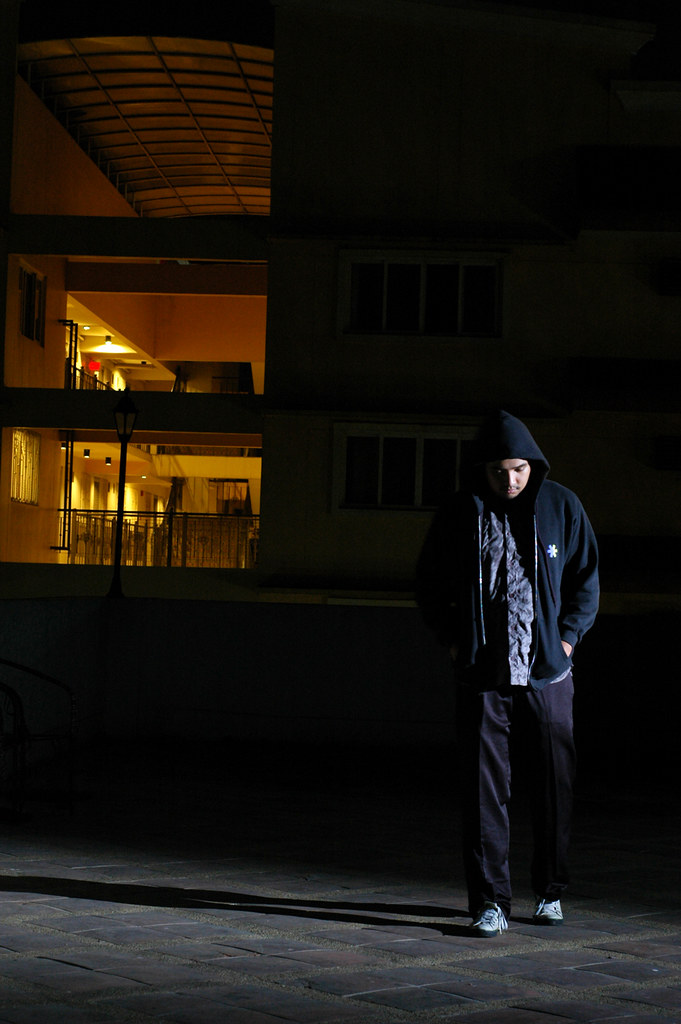
Today was nice, as I was able to have my wife to volunteer to help me. I guess it was much more fun having her help me shoot. Who says self portraits need to be always done by yourself? This was shot at the rooftop of our condo's clubhouse. It was pretty dark and I had to use a 1 sec exposure to burn the light of the nearby building. Hope you like it.
Day 2 was a little easier with the power back on, but coming home late didn't help as much. My idea for today, was very reflective of how my day went - it was a long, tiring and very emotional day. Hope you like it.
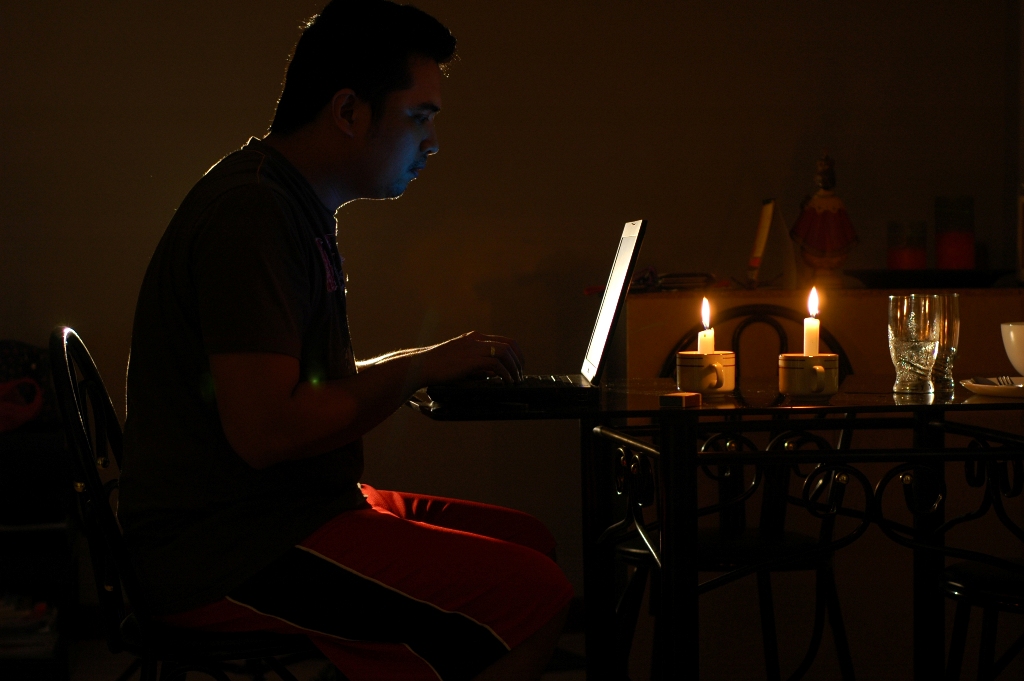
They say the first steps are the most difficult. That happened to me tonight. Not only was this the first day of my one/project, it also turned out there was a power interruption for the next few hours. Damn! So, even though I had the night planned - from concept to location, it turned out those plans won't be for tonight.
I had 2 options: A, go to bed and end this not so good day; or B, try to make something out and stick to the project. Of course, I had to stick with option B. I wouldn't let tonight be a waste. It was interesting, and this was what I came up with. Grabbed my laptop, a couple of candles and began typing this blog. I just knew I have to upload and post this somehow. This is what I have been talking about doing projects. Everyday is different and you can't be sure what will happen, even if you planned it. It happened today, and I'm just on the first day.
I forgot to mention some requirements for this project. First I can only use one lens for the duration of the project. For this I chose my trusty 50mm 1.8, or nifty fifty as others call it. I will have to make do and adjust with what the short comings of the lens, primarily it not being wide enough and in some cases, not close enough. I do get the advantage of the lens being great under low light, and its sharpness wide open.
Second, I can only use one strobe or flash for the project. I am using my new Yongnuo 460 MkII, a nice manual lens that is very affordable. I'll do a post about this in the future, but you can see more here. It has many advantages,like its price and variable power settings, but it doesn't have a zoom, nor a synch port, which makes it difficult to put it in a light stand.
Lastly, I would need to post one pic per day for seven straight days. I'll have to think creatively and make each day different as well as interesting. I hope I'll be able to do what I have planned for tomorrow.
As I wrote here, this is one of my resolutions for this year. Photo projects squeezes out the creative juices as well as forcing myself to get out and shoot (and then blog it) specially if its a daily one. Here's the first of hopefully many projects for 2010.
This is the one/project. This is a project that I will be doing for one whole week starting Monday. I'll be posting one photo a day here in the blog and on my flickr stream using only one lens and one strobe (flash), in the most interesting way I can. This is really a basic project, but I thing I can put some twist to it and make it interesting. This will last until Sunday, and hopefully I will have 7 unique and interesting photos for you all.
Thanks to Selbosh for linking to the blog. He featured the "informal" review I made of the Q-Strap from a few months ago. If you don't know yet, he's site is a very nice resource for upcoming products for lighting and strobist related stuff. His links mostly will lead you to ebay (which is not as useful to us in the Philippines, as we can buy these stuff from Quiapo), but it nice to see what manufacturers have in store for us.
He also has links to the Strobist.com flickr group for real-life reviews of some products. It really helps before deciding to buy gear.
Lightingroumours is definitely RSS/bookmark worthy.
For more of Lighting Rumours go to lightingrumours.blogspot.com
Alright I know it's been a a month since the year truned anew, and its been a couple of months since my last post. But better late than...well, later I guess. Here are some photos from the holidays:
My lovely niece Bea:
My Wife and her sis Lei:
Me, with my wife and Mom:
Yup, that's me dressed up as Santa : )
My wife after receiving an autographed cd of her favorite singer:
I guess the New Year brings some hope to everyone. Me, I hope I'll get my life in order, prioritize what needs to be prioritized, and try to keep doing what I love: Photography. My main goal this year is learn and develop my skills and create one of a kind images. Practice makes perfect, and I believe just by shooting everyday will benefit me more than by reading everything on the net. Here are my photography resolutions for this year:
Shoot at least one photo a day. One well thought photo is better than a thousand random ones
Bring my camera - ALWAYS.
Spend less time on online forums like the Flickr Strobist group. As much as members are helpful, spending too much time there is time taken from taking pictures
Stop thinking about adding more gear. I have enough (this one goes against my gear head mentality but I'll do my best)
Start photography projects. May it be a 50/50 ala Bert Stephani, or a Film Strobist project, projects pushes people to be creative and I'll need all the "push" I can get.
Not every photo needs to be lit. Strobist is not everything. Natural light is good.
Set time from my day job to just shoot. I'm plotting vacation time now just for me to be able to shoot
That's it for now. I'm still learning a ton of stuff on post processing with Photoshop CS4. I'm not too much of post processing kinda guy, and I normally get what I want (almost always) straight out of the camera. It's a cool editing tool, but again, spending a ton of time editing doesn't really say much about my photography. :)
Some might say Taking low light photos are a PITA to do. But for off camera flash users, also called as "strobists", this is one of the most favorable times to take pictures. This is because you have total control over lighting the area. But for other types of photography, low light is really a problem.
The problem arises when you try to let as much light into your sensor, either by using a slow shutter speed,using a wide open aperture, or using a high ISO. A slow shutter speed might get you more light, but your shot will be blurry because of camera shake (aka your hand moving as you take your shot) and motion blur (aka your subject moving before you can end your shot). Using a wide aperture is nice, but if your using aperture priority, your camera might still choose a slow shutter speed and get the same blurry images. Using a High ISO, you'll get grainy pictures. Using a combination of all is maybe your best shot but it doesn't always go your way.
Here are some things I do to get better shots:
1. Use a Tripod/Monopod - this will help you get rid of camera shake; best for landscapes
2. Use flash - may it be off camera or your on board flash, flash will stop your subjects' motion, as well as allowing you to use a faster shutter speed; Best for event photography
3. Use a higher ISO - I know I said this will make your photos grainy, but just using the right ISO will give you a little more shutter speed, while minimizing the grain.
4. Shoot with a fast lens - this means a lens with at least an aperture of f2.8 and lower. This means you get that extra f-stop to get a faster shutter speed
The shot above was from last night. I was on the top floor of our condo and taught I can do some nice photos. I forgot to bring my tripod, so this was done hand held. Its a pretty sharp photo, as I used the tips above (except for the tripod, duh). It was also sharp because I used a trick for shooting without a tripod. Here's the shot of the place with all ambient light, @ f/2 shutter 1/6 ISO 400
Not really a good shutter speed, camera shake was obvious and the light really sucked. Clicking the shutter as the exposure starts add more to shake. I don't have the steadiest hads so that's not helping. So here is what I did:
1. Turn your timer on. I used 10 secs for the shot above, but for people shots use the shortest time you have
2. Make sure you are in a stable position. I was sitting for the shot above, but you can lean on a wall, or use anything to stabilize yourself. I also made sure I tucked my elbows in.
3. Pre focus on your subject and then recompose your shot. Then change your camera/lens focus to Manual Focus.
4. Take the shot and stabilize yourself while the timer countsdown. If your subject is a person, count verbally as your timer counts down. Make sure you do not move while the exposure is being taken.
This, of course, would really not be the best for people shots but if you have nothing to go for, you still have a way to take decent photos. And, for those who do not have fast lenses (I used a f1.8 lens for the shots here), I actually used f4.0 - f6.3 for the shot above and the ones below. You really do not need really expensive lenses, as long as you know how to use your gear correctly. Here are more shots from last night.
Hope this helps you on taking better low light photos. Keep Shooting!
Most great products nowadays have their counterpart "knockoffs" or for a better term, a cheaper alternative. For every Pocket Wizard there's an alternative Cactus trigger (actually there's prolly a little less than 10 that I can think of). Most of these are made in China, such as the Cactus triggers/flashes, lightstands, umbrellas you name it. Heck, even the original branded photographic supplies are most probably made in China. There are even some Nikon lenses made in China. As the saying goes, God made the world, the rest was made in China.
But this doesn't mean that the cheaper alternatives from China (or anywhere for that matter) is not of good quality. Some are equally as good. But I think the more pressing issue is copying something from the original and then selling it cheap, somewhat like piracy in the entertainment industry. But the product I am reviewing now is/could be an exception.
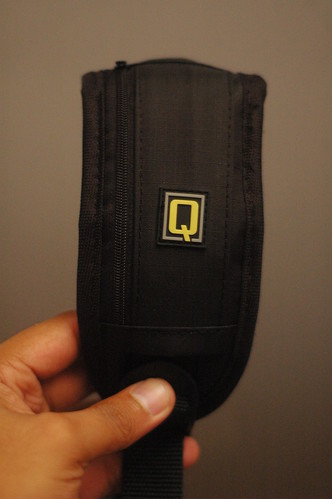
Photo above is the Quick(Q)-Strap. It's basically a strap that is attached to your camera via the tripod mount and is worn like a sling. At first glance, you would probably say that its a cheap imitation of the R-Strap. But looking at it closely, and when using it, you will see that there are substantial differences. And in some points, it actually iis better than the R-Strap.
First the similarities. The Q is made of the same material as your regular camera strap and it feels like the same material used for the R-Strap. Even the metal used for the clip feels and weighs like they were from the same type of metal. The strap looks sturdy and could probably support more than 5 times the weight of an average camera. But the similarities end there.
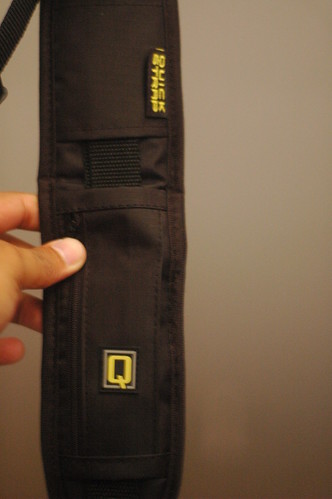
The Pouch - the Q has a pouch for memory cards and what not, but its not as comfy for your shoulders as the R. Not a big deal, again as you'll only notice the difference after a few hours of continuosly wearing it.
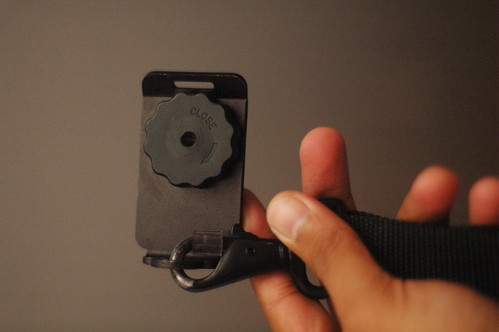
The Clip - its prolly of the same metal alloy, but unlike the R, the Q only has a plastic lock that you slide into place to prevent the clip from accidentally being opened. To me that's a minor issue, as once the clip was attached, I have not removed it since. I just remove the mount from the tripod mount.
The Mount - the R has a unique mount called the FastenR2 that resembles a screw with a loop where the clip attaches to. The Q's mount is different as it is more of a screw that locks a piece of metal with a hole on one end where the clip is attached. The screw at the bottom also has a female tripod mount for easy attachmnt to a tripod, while the R, because of the mount design, doesn't. Both are pretty much locked into the mount. The clip rotates not the mount screw. Also heard reports of issues with the R-Strap when using a Vertical grip or when used with a D3 or a 1Ds as the FastenR pokes your pal while on vert. The Q-Strap is quite nice as the hook loop is at the side, which becomes the bottom of the cam when on vert position.
Wearing it - Both wears like a sling, with the lens pointing to your back. With the Q, because of the mount design, the lens moves a little to the front. The R is more of attached to the middle of the camera and sits still almost always. Sorry no photos of me wearing it. Just doing this in between a busy week. : )
Overall build Quality - The Q, as expected, is built a little less than the R. The first day I used it some paint from the clip chipped off. The metal feels solid and looks like it will last along time. I have tried it on an event shoot and it saved me from so much stress, as the weight of the cam is not concentrated at your neck but to your shoulder and across your body. I used two cameras that day and I never felt a strain on my body.
For half the price, the Q - Strap maybe the best alternative to the original. This is not piracy, not even a knock-off. It's a different product that runs better in some ways than the original.
If you're in the Philippines, you can get the Q-Strap from JT Photo. Visit their site here and here for more details.